We live and work in a cold, cruel world where our laptops can take a lot of abuse. Regardless of how gentle we try to be, our notebooks will probably be dropped, spilled upon or worse—sooner, if not later.
But if you think that all notebook damage can be repaired only by the manufacturer or a computer shop, think again. Many problems can be inexpensively and easily fixed with common tools, spare parts, and a little effort. Some repairs are no harder than high school art projects. That said, there are modern laptops that are very difficult to open and repair. If you can’t see any screws, you’re in for a tough time.
Using a couple of old, beat-up mainstream notebooks, we’ll show you how to fix everything from a broken case and frayed charger cord to a bad fan and scratched screen. Each restoration project has time and cost estimates, as well as what materials you’ll need to do the trick. Just follow the basic directions we’ve outlined for each repair.
Fair warning: Your system might be a little different, require special parts, or need a slightly different approach. YouTube is your friend.
One additional note: While we generally applaud improvisation and recycling old parts (especially AC adapters), there’s nothing like having the precisely correct part to do the repair. In fact, while fans and notebook keyboards may look similar, they can be very different. Each repair features links to where you can get the right parts, but they are just a sample of what’s available. If all else fails, try eBay, Newegg, Amazon, or CDW to get what you need.
- Problem: Frayed AC adapter cord
- Problem: Cracked laptop case
- Problem: Bad laptop fan
- Problem: Stuck key on laptop keyboard
- Problem: Scratched laptop display
Problem: Frayed AC adapter cord
Cost: $5 to $15
Time: 1 to 2 hours
Materials: Silicone sealant, painter’s tape (which is less sticky than regular masking tape), protective gloves (optional)
Because a notebook that travels needs to be plugged in and unplugged several times a day, the cord and connector can take a beating, leading to a frayed or otherwise damaged power cord. If this happens, it’s important to get a new cord or fix it right away, because it not only can damage the system’s battery through intermittent charging, but it can also be a fire hazard.
Fortunately, many laptop power adapters have removable AC power cords, which cost a few dollars and are available online or at electronics stores. On the other hand, if the connector that plugs into the computer is the problem, it can cost $50 to $75 to replace if you opt for the exact AC adapter for your laptop from your notebook manufacturer, Amazon, or eBay (search for your make and model name followed by “AC adapter”).
Or you can just fix it yourself.

Brian Nadel/IDG
The quick-and-dirty repair for a frayed cord is to wrap electrical or duct tape over the damage. This prevents further damage, but over time will come loose—not to mention leaving that sticky gunk all over the cable when it does.
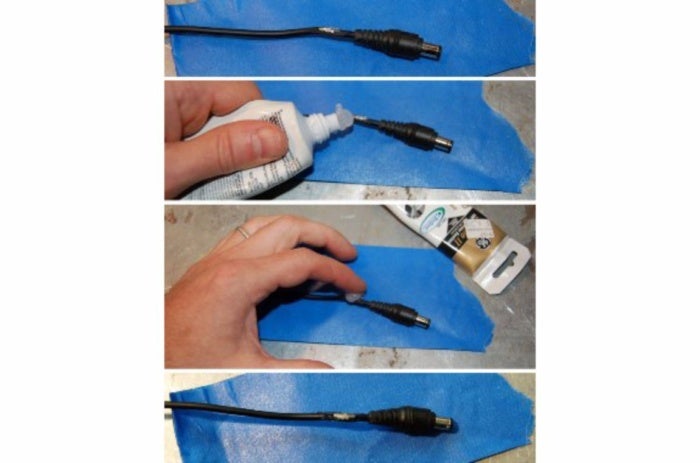
A better way is to make a more permanent repair with silicone sealant, available at any hardware store and many supermarkets, which will insulate and protect it. It’s best to use black to match the cord’s color, but clear sealant works just as well.
To protect the surface you’re working on, lay down a wide strip of painter’s tape, sticky side down, and place the frayed area of the cord on top of it. The sealant won’t stick to the back of the painter’s tape the way it might to other barriers made out of paper or plastic, and the painter’s tape should peel right off the table when you’re done. (Note, however, that you shouldn’t be doing any kind of computer repairs on your good furniture.)
Next, squeeze out a gob of sealant onto the area that needs fixing. Work the gooey sealant into place, covering the damage with a liberal coating. If you have sensitive skin, it’s a good idea to wear thin protective gloves for this part.
Let the sealant cure for an hour or two until it is firm. Gently remove the cord from the tape (and the tape from the table), and you have the equivalent of a new power cord that’s flexible and ready for years of road work.
Problem: Cracked laptop case
Cost: $15
Time: 2 to 3 hours (20 minutes to set up the repair, 5 minutes to place and shape the putty, an hour or two to let it cure, 10 minutes to sand it, 30 minutes to paint it and let it dry)
Materials: Epoxy putty, sandpaper, razor blade, Sharpie marker or paint, gloves (optional)
When notebooks get dropped, more often than not they land on the corner, one of the weakest parts of the case. Unless you have a ruggedized notebook, there’s a good chance that after an encounter with gravity, the corner will be cracked or—as was the case with my laptop—broken through completely.
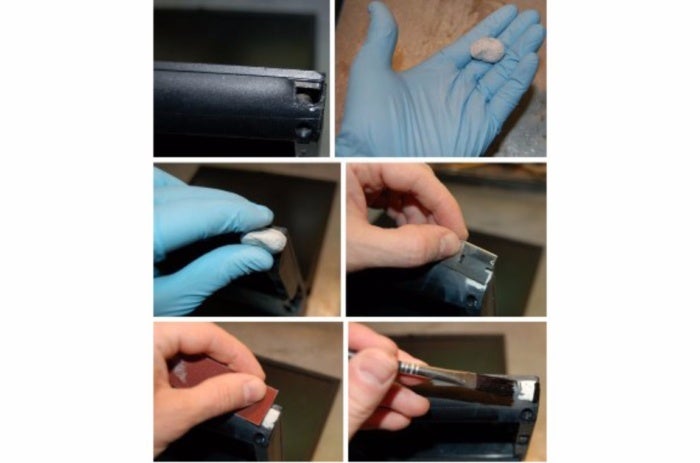
The secret is to use epoxy putty to fill in the broken part of the case. Epoxy putty is available online or at any hardware store for around $4 to $6 a tube, so you can even do this repair on the road. The brand of putty you choose doesn’t matter, but avoid the quick-setting variety because it might harden before you’re done.
First, make sure the damaged area is clean and free of dirt and loose pieces.

[“Source-timesofindia”]
