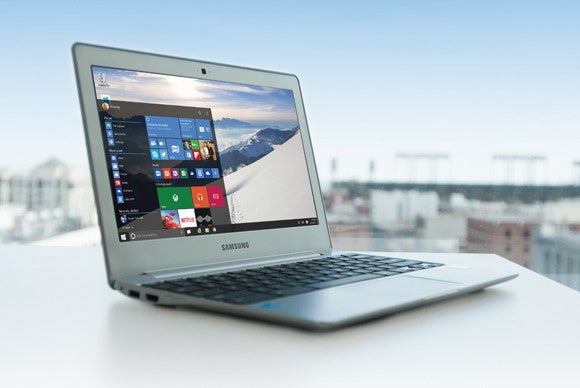
Procrastinators beware. If you’re a Windows 7 or Windows 8.1 user, you’re nearing a big deadline: on July 29, the free period to upgrade to Windows 10 expires. If you intend to upgrade but haven’t actually completed the process, we can help.
For consumers, the choice is a simple one: You’ll be upgraded to either one of two versions of Windows 10: Windows 10 Home, or Windows 10 Professional. (This guide doesn’t cover the upgrade process to Windows 10 Mobile for phones.) Microsoft has also released the official retail pricing for Windows 10, in case you’re building another PC.
During the update process, plan to invest some time in prep work and at least an hour or two in the upgrade process itself. And be careful—some of your applications may be left behind or simply turned off.
(Editor’s Note: We originally wrote this story a year ago, in 2015, to explain the upgrade process to Windows 10. We’ve updated our story with more details of how the process has evolved, and explain how you can still upgrade to Windows 10, then revert back to Windows 7 or Windows 8.1.)
Aside from one major component of some versions of Windows 7, however, the transition between the earlier versions of Microsoft’s operating system and the new Windows 10 should be relatively painless. Basically, if you own a “Pro” version of Windows, you’ll migrate to the Professional version of Windows 10. Otherwise, expect to receive a copy of Windows 10 Home. (We have more about the individual Windows 10 editions here.) Be aware, though, that on Aug. 2, you’ll also receive the first major update to Windows 10: the Anniversary Update. More on that later.

MICROSOFT
Besides this story, a good reference is Microsoft’s Windows 10 FAQ itself, which explains, for example, what happens to existing applications on your PC, including (expired) anti-malware subscriptions. Also, it offers one piece of important advice: Make sure you’re running a genuine, licensed copy of Windows—sorry, Microsoft won’t be upgrading pirates for free.
Contents
Windows 10 prep work
Preparing for Windows 10 was never that hard to begin with, but Microsoft’s made it even easier. Windows 7 users must be running Service Pack 1 to enable the update. At one point, Windows 8 users were required to upgrade to Windows 8.1 before they upgraded to Windows 10. Microsoft representatives confirmed that this is no longer the case, though—Windows 8 will do just fine.
I’ve negotiated several upgrades without having any issue with losing files. Just to be safe, though, back up all critical documents, photos, videos, and whatever else you deem important onto an external storage device of some sort. “Applications, files and settings will migrate as part of the upgrade, however some applications or settings may not migrate,” Microsoft says, somewhat cryptically.
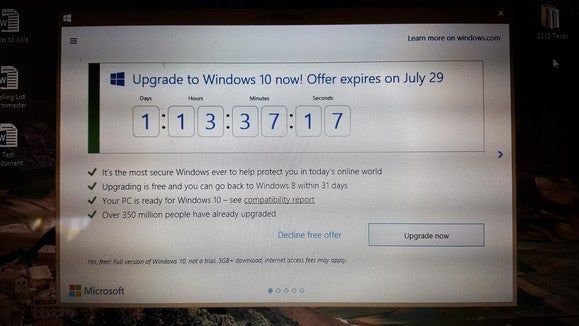
If you’ve done that, then you’re ready to begin. Look for the tiny Windows icon down in the right corner of your taskbar, and click it to launch the Windows 10 reservation app, also referred to as “Get Windows 10” or “GWX”. You’re probably pretty familiar with it anyway, as that’s the app that’s been continually reminding you to download Windows 10.

MARK HACHMAN
Here are the system requirements for Windows 10:
- Processor: 1 gigahertz (GHz) or faster processor or SoC
- RAM: 1 gigabyte (GB) for a 32-bit version, or 2GB for 64-bit
- Hard disk space: 16GB for a 32-bit OS; 20GB for 64-bit OS
- Graphics card: DirectX 9 or later with WDDM 1.0 driver
- Display: 1024×600
MARK HACHMAN
Microsoft also warns that even if your PC seemingly meets those specifications, it might not be upgraded. “Driver and firmware support, application compatibility, and feature support” could affect whether the Windows 10 upgrade takes place. Fortunately, there’s one way to be sure: use the “check my PC” function within the reservation app. Chances are that the Get Windows 10 app will already tell you whether or not your computer has been qualified to run Windows 10, though.
Microsoft advises that the Windows 10 download will be about 3GB in size. I found that on a 75-Mbit/s home broadband connection, that took a bit more than 20 minutes. Since the PC I was upgrading contained a regular old hard drive, however, it was the installation that took forever: about 35 minutes just for the “preparation for installation” alone. If you own a newer computer with an SSD inside, however, expect the installation to proceed much faster.
Once the “installation” phase completes, your PC will reboot and the “upgrading Windows” phase will begin. During this time, Windows will show you a general overview of how the upgrade is proceeding (the large circle in the middle) and a more detailed view at the bottom of the screen.
Once you move into the actual “upgrading” phase, as evidenced by the large circular progress icon in the middle of the screen, the process should be rather anticlimactic. After a reboot or two, you’ll be asked to log in using your password. After my upgrade was completed, I was rather unceremoniously dumped into Windows 10. That all took me about two hours to upgrade an older Asus PC to Windows 10.
What you’ll leave behind by migrating to Windows 10
The upgrade process will involve some sacrifices—but Microsoft is making an effort to make the transition as painless as possible.

For one thing, if you own the premium versions of Windows 7 — Windows 7 Home Premium, Windows 7 Professional, Windows 7 Ultimate—as well as Windows 8 Pro with Media Center or Windows 8.1 Pro with Media Center… say goodbye to Media Center. Microsoft is going to install its own DVD-playing app into Windows 10 to replace it: the Windows DVD Player app, which (due to licensing fees) costs $14.99. (Just download the free VLC app instead.) Likewise, Windows 7 desktop gadgets will be uninstalled. And the Windows 7 versions of Solitaire, Minesweeper, and Hearts that came with Windows 7 will also vanish, to be replaced with new versions of those apps with Windows 10.
Microsoft also says that it may erase “some applications that came from your OEM.” That seems to imply that some of your PC’s bloatware—or prized utilities, depending on your view—could vanish.
Finally, Microsoft will uninstall, then reinstall, your antivirus application. If your subscription is out of date, however, only Microsoft’s own subpar antivirus app, Windows Defender, will be installed. (Microsoft tried this in 2013, then backed off.) Be sure and check this after upgrading, though Microsoft should also warn you if anything is amiss via its fly-in notifications. I found that my antimalware solution and firewall survived the upgrade process just fine, but the firewall was turned off.

MARK HACHMAN
Some additional assembly required
Keep in mind that older hardware simply won’t include some of the hardware conveniences being included inside new Windows 10 machines. For example, Windows Hello, which logs you into your PC by recognizing your face or your fingerprint, won’t work with a webcam—you’ll need a new depth camera (like a Kinect for Windows or Intel’s RealSense) to enable it, or a third-party fingerprint reader. Speech recognition will work best with a high-fidelity microphone array; no surprise there. And there’s a whole host of nitty-gritty specifics that Microsoft has included for Windows 10 Professional, such as a requirements for BitLocker and Wi-Fi Direct Printing.
You’ll have just a few days to get used to everything, though, before the Anniversary Update kicks off on Aug. 2. Again, make sure everything is up to date. Though the Anniversary Update has a big, grandiose title attached to it, think of it more as a service pack. You can get an idea of the changes that were made to it in our Anniversary Update review.
How to “downgrade” from Windows 10 and go back to Windows 7 and 8.1
Congratulations, you’ve upgraded to Windows 10. But what if you want to go back?
If you’ve upgraded to Windows 10, then changed your mind, there is an escape hatch. If you wish, you can revert back from Windows 10 to your older operating system within a 30-day window. (Once that 30 days expires, though, the upgrade is permanent!)
MARK HACHMAN
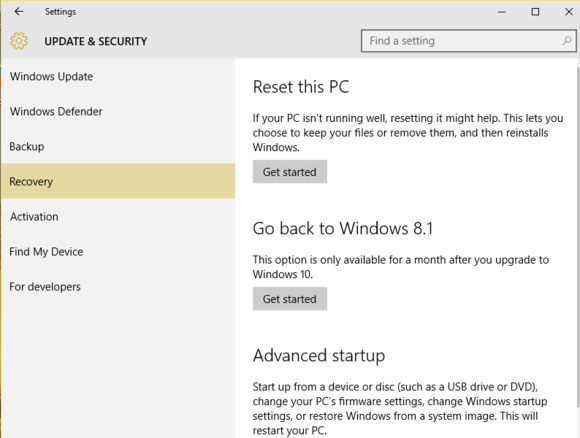
To downgrade to Windows 8.1 or Windows 7, open the Settings menu, then Update & Security > Recovery. If you kick off that process, you’ll have the option to go back to your previous operating system. (If those 30 days have expired, however, you’ll simply see options to “Reset this PC” or “Advanced Startup”—neither of which will revert the PC to the earlier operating system.)
It’s a pain, but many feel that even if you have no plans to upgrade to Windows 10, you may as well snag the free upgrade, then revert back. Before you do, though, play it safe: grab a copy of your Windows 10 product key. (Windows 10 should automatically give you a “digital entitlement” to your license simply by upgrading; again, we’re just playing it safe.)
How? Well, we’d recommend trying two ways: first, this Nirsoft utility should snag your Windows 10 product key. Copy it down and squirrel it away, just in case Windows eventually asks for it if you ever decide to upgrade again. (You might find some help in locating your Windows key on your PC with this older guide, too.)
Now what? If you’re new to Windows 10, check out our guide to your first 30 minutes with Windows 10. That will give you a brief introduction of Windows 10 and its various features. Your final step: keep PCWorld.com bookmarked. We’ll keep you up to date on what you need to know about Windows 10.
[“source-gsmarena”]
